Optimising Dark
Dark is a game that I made over a period of four months in 2009, for Microsoft’s Dream Build Play competition. The game was written in C# using XNA. Dark isn’t especially fun – the competition deadline meant I didn’t leave much time to work on the gameplay. But it remains a fantastic tech-demo for two pieces of technology that I am still very proud of: A physics-based platformer engine, and a 2D vector-based soft-shadow renderer. Dark is now a free download for PC.

The target hardware for Dark is an Xbox 360 running at 1080p. Maintaining a smooth frame-rate, while still rendering the large number of lights seen in the environments in Dark, required a large amount of optimisation work. In this article I will describe how the shadow renderer works and how I optimised it.
(This blog post was inspired by a question asked by Sharpnel over on the Game Development Stack Exchange. He asks about how to optimise Catalin Zima’s shadow-casting method, which is a render-target-based technique. But many of the optimisation techniques I will describe here can be applied to any method.)
Dark was only ported to the Xbox 360 from the PC late in development – with maybe only a couple of weeks left. The game ported cleanly, having only performance issues on the more constrained console hardware. That says a lot about how good the XNA API is (or was – it still blows my mind that Microsoft would discontinue what was probably its best API – especially as they are essentially an API company. I digress).
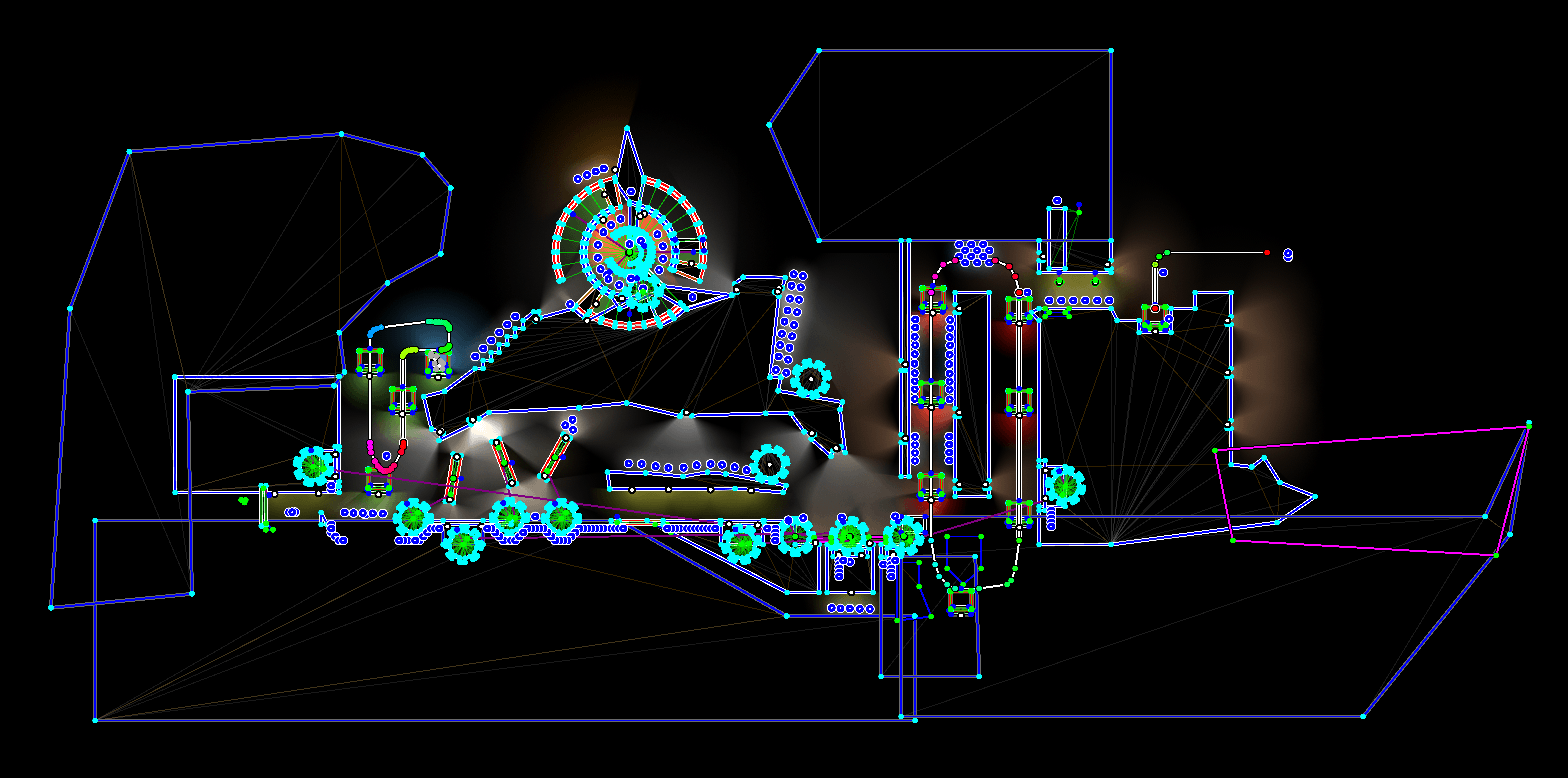
To illustrate just how difficult optimising Dark was, the first optimisation I will describe was the last one implemented – a dreadful hack: Coming up against the competition-deadline, I still could not get the most complicated level in the game (the “Factory” level, pictured above from the editor) to run at a constant 60 FPS. As a last resort, I deliberately changed the target frame-rate for that level (and only that level) to 30 FPS.
The level could run faster, only dropping to about 50 FPS in some places. But V-sync means that 50 FPS becomes 30 FPS screen refreshes can only be skipped – you can’t change their timing. A smooth 30 FPS is preferable to the off-putting jumps between 30 and 60 FPS.
Before I get onto describing the renderer, I will also quickly mention the first step I took in optimisation: The garbage collector on the Xbox 360 is horrendously slow, and Dark was allocating memory in several innocuous places (a temporary buffer here, a string concatenation there), which caused it to stutter.
The solution to this, of course, is to never allocate memory during a game’s draw/update loop. This is reasonably easy to fix, because it is very easy to spot allocations using Microsoft’s CLR Profiler. Replacing code with an allocation-free equivalent is usually a fairly straightforward process, once it has been identified.
The Shadow Renderer

The shadow rendering in Dark is done using a vector-based approach. Here is a quick overview of how it works:
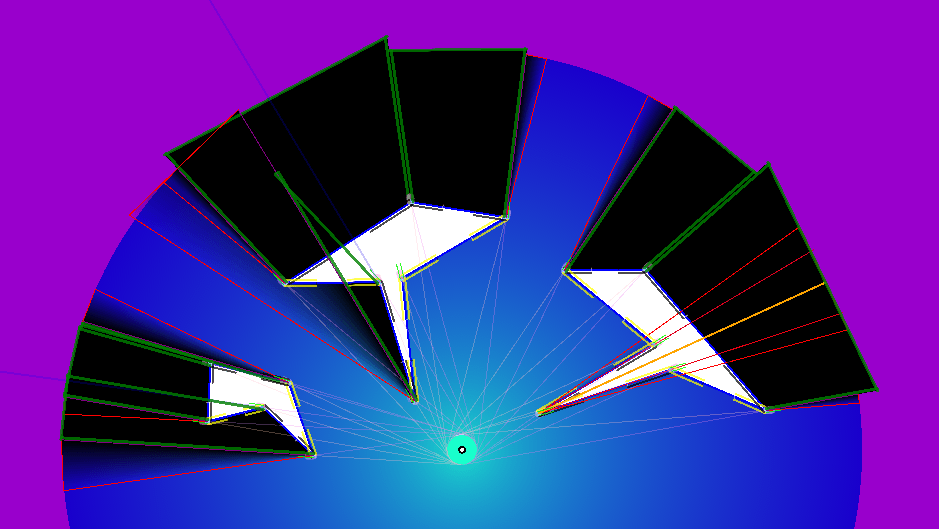
For each light-source in the world, shadow geometry is drawn for each piece of level geometry. This geometry consists of umbrae and penumbrae. An umbra is a completely shadowed area, which is drawn as a quad projected from geometry edges that face away from the light source. A penumbra is a partially shadowed area (the “soft” shadows) which is drawn as a triangle projected from a vertex that is between a lit and an unlit edge. The width (angle) of a soft shadow is a function the light’s source radius and its distance away.
The process can be seen in this development screenshot, with umbrae outlined in green and penumbrae in red. This also illustrates some of the special-cases that must be handled (spot the orange and purple lines), particularly as it supports concave shapes. The algorithm is tricky, to say the least.
The geometry required to create the umbrae and penumbrae are encoded into vertex buffers. The geometry starts out “flat” against the objects in the world, and is then “inflated” using a vertex shader on the GPU based on the position and size of the light being rendered.
There are two vertex shaders that are used – one for umbrae and one for penumbrae. I targeted Shader Model 2.0, which made sense at the time, but ended up requiring a great deal of trickery to fit the very complicated algorithm into the very small shader-instruction limit.
Doing shadows on the GPU meant that the shadowing system itself could run faster – the GPU is well suited to running algorithms that apply the same process to a large amount of data. It also meant that the CPU would be free to spend its time running the physics engine.
After the shadows are drawn, the remaining, unshadowed areas are “filled in” by a full-screen effect.
And this is the first optimisation (or possibly non-optimisation, read on): There are no render targets. Shadows are drawn into the alpha channel of the back-buffer using separate-alpha-blend. Then, rather than using a pixel shader, blending is used to fill in the lit areas by modulating the amount of light by the back-buffer’s alpha channel. As an added bonus, this lighting step clears the alpha channel for the next light’s shadow step.
Of course, what I did not know at the time, is that some blend modes are faster than others, with common ones being special-cased in hardware. I have no idea whether my blend modes are common – they probably aren’t. But the fall-back is usually a fragment shader, so hopefully it is not actually slower.
The choice to not use render targets is mostly down to my inexperience with them at the time (I come from a classic-OpenGL background, remember NeHe?), rather than any concrete performance concern. An argument could be made that, by using a single buffer, I possibly saved a lot of copying of data out of EDRAM on the Xbox 360.
I thought it would be faster. But I never actually measured it, so I don’t really know.
Burning Fill-Rate

Of course, drawing shadows and lights like this burns a massive amount of fill-rate (that is: how many pixels can be drawn on any given frame). Certainly a lot more than a typical Z-buffered 3D game, which will generally try to get as close to zero overdraw as possible (touching each output pixel only once).
The umbrae and penumbrae end up being very large polygons that cover large areas of the screen. The shadow-casting algorithm tries to avoid overdraw but, as shadows are calculated on the GPU, it can only consider local data. So multiple shapes and concave shapes can draw shadows over the top of existing shadows. Then, on top of that, the full-screen lighting pass draws over everything again!
The first step to determining the cause of a performance problem is to measure it. In this case, I measured how many lights could be displayed on screen at any one time (with a single piece of simple geometry, to eliminate any geometry-based effects), before the frame-rate dropped below my target: About seven fully-lit screens, as it turns out, on my target hardware and resolution.
Obviously I wanted to have levels with more than seven lights, so the first step was to cull any lights that are entirely off-screen with a simple circle-rectangle intersection test.
But I also want to have more than seven lights on screen at once. Many of those lights would be small or partially off-screen, so I was wasting a lot of fill-rate by rendering a full-screen effect for each of them. Fortunately graphics hardware provides a solution designed to solve exactly this problem: the humble scissor rectangle, which constrains rendering to a particular region of the screen.

The above screenshot demonstrates this. It was taken in a heavily-lit part of the game, with my performance-counters switched on. They are saying that there are 21 lights being rendered, 13 of which have shadows. But there are only 6.7370 “Lit Screens” being rendered.
By measuring in “screens” (rather than pixels rendered or frames per second) I was able to design levels and test them against the limits of my target platform, without having to actually run the game on that hardware or at that resolution (I spent most of my development time on my PC, and at the time I didn’t have a PC monitor that could display 1080p).
But even putting scissor rectangles around my light radii was not enough to get as many lights as I wanted into the Dark environments. Many of the lights in Dark are directional, especially the larger ones. The area “behind” a directional light is still inside its radius – but will always be in shadow. So those lights have manually placed boundaries that further crop the light’s scissor rectangle. Those boundaries can move and rotate, for lights that are attached to moving geometry.

Above is another screenshot of the Factory level in the editor. Compare with the screenshot from earlier in the article and note the many dark-red and black lines in this one. These are the manually placed light boundaries – what a mess! Below is a screenshot to demonstrate the clipping effect on a lone light in an empty level:

Finally there are a few other small techniques to reduce overdraw: Shadow geometry doesn’t need to extend beyond the radius of the light being rendered – so it doesn’t (see this screenshot again). And the interior of shapes is not considered for shadows at all (they are simply overdrawn with black after all of the shadows are drawn).
Burning Batches

Dark was the game that I learned about the “batch limit” on. It wasn’t a well-publicised problem when I was writing Dark, certainly not in the independent scene – one of my friends doing AAA games had to tell me about it. I’d like to think I’ve raised a lot of awareness about it, since then, by talking about it so often on Stack Overflow and on Game Development SE.
The “batch limit”, put simply, is the number of draw calls you can make to the hardware each frame (while maintaining your target frame-rate). Each draw call has some CPU cost associated with it, as the driver does the heavy lifting to get it from the CPU to the GPU. So, as well as being a limit itself, it also competes with other code running on the CPU – such as, for a relevant example, a physics engine.
Dark has relatively simple geometry, but it needs to be drawn many times. Each piece of level geometry needs to be drawn twice (umbrae and penumbrae) for each light, and then once again to fill it in with black. This adds up to a lot of draw calls.
As with fill-rate, I track this number with a performance-counter (“Shadow Geoms”, in the screenshot below, representing the number of draw calls made for shadow-casting that frame), and I figured out what the limit was for my target hardware. To take a measurement of that limit, I replaced my shaders with versions that did not actually project shadows or draw anything (to remove any GPU-side rendering effects from my measurements). Then I kept adding more geometry until my frame-rate dropped below my target.
The result of this experiment was that I could issue about 300 draw calls before performance began to suffer.
Now, the best way to drastically reduce the number of draw calls being issued would have been to merge all of my static geometry for the level into a single vertex buffer, and drawn it all with a single draw call. Although, it is possible that this would have overloaded my very expensive vertex shader with irrelevant geometry from far-off places in the level, in that case I would have had to implement some form of space partitioning.
Unfortunately, I found out about my batch problems so late in development that I didn’t have time to restructure my engine and level editor to support the merging of shadow geometry. So I did the next-best thing: Culling. Lots of culling.
A light can only shadow geometry that is within its light radius, so any geometry outside that radius does not get drawn for that light. Same goes for any manually specified light-boundary. And, as I mentioned earlier, I was already culling any lights that are off screen – so they also didn’t cause any shadow draws.
With culling and a performance-counter target, I was able to go through my levels and manually optimise any hot-spots that were causing too many shadow draws.
But that was not enough: Some geometry – most often the large, concave geometry around the edge of maps – simply cannot ever cast a useful shadow. Their rear edges that would cast the shadows never appear on camera. So those pieces of geometry are flagged to not even try to cast shadows. This is particularly important, as these pieces of geometry are usually large, and so will succeed bounds-checks (I used an AABB) for large numbers of lights, the majority of which couldn’t possibly cast a shadow from them anyway.
(Similarly, there are a few lights in the game that are flagged to never cast shadows.)
But even that was not enough. The pickups in the game are all light-sources, which gives them a nice moving-shadow effect as the player picks them up and they get “sucked” into the player. As with the large geometry, these small lights would have a majority of successful bounds-checks against geometry they did not have a hope of actually producing a useful shadow against.

The answer, or trick, in this case, was to simply make pickups not cast shadows against the world at all! They only cast shadows against the player. After making this change, there were a few pickups in the game that were now noticeably missing shadows against the world. But it was then a very simple matter of moving them away from those shadow-casting corners of the world, to where their lack-of-shadow was not noticeable.
Conclusion
Optimising Dark basically involved a three-step process:
The first step was to form a hypothesis of the underlying cause of the performance problem, usually through intuition, but always verified by isolating the issue and verifying its actual effect on performance.
The second step is to find a way to measure the thing causing the performance problem (eg: screens of pixels rendered, number of batches submitted), and then methodically increasing it to determine the limit where it starts to degrade performance. It’s important, in this case, to have some idea of the target hardware.
The third step is to find creative ways to ensure your game stays below that limit. This can often involve code changes – but for a game like Dark that pushes the limits of its hardware, may also require manual tweaking of content.
~
I’ll leave you with a link to an answer of mine on Game Development Stack Exchange, which gives an overview of many of the limits you might encounter when developing a graphically complicated game.


